반응형
기본 메뉴(상단 메뉴)

#if UNITY_EDITOR
using System.Collections;
using System.Collections.Generic;
using UnityEditor;
using UnityEngine;

public class MenuItemTest
{
    /// <summary>
    /// "CustomMenu/Menu_1" : 메뉴 경로
    /// false : Validate 설정(뒤에 설명)
    /// 1 : 메뉴 순서
    /// </summary>
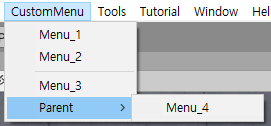
    [MenuItem("CustomMenu/Menu_1", false, 1)]
    static void Test_ContextMenu_1()
    {
        Debug.Log("Menu_1");
    }

    [MenuItem("CustomMenu/Menu_2", false, 2)]
    static void Test_ContextMenu_2()
    {
        Debug.Log("Menu_2");
    }

    [MenuItem("CustomMenu/Menu_3", false, 13)]
    static void Test_ContextMenu_3()
    {
        Debug.Log("Menu_3");
    }

    //! 메뉴 순서가 이전 메뉴와 10차이가 나면 라인이 그어지면서 나눠짐
    [MenuItem("CustomMenu/Menu_4", false, 14)]
    static void Test_ContextMenu_4()
    {
        Debug.Log("Menu_4");
    }
}
#endif
Editor 관련 코드는 전부 #if UNITY_EDITOR안에 들어 있거나 해당 코드가 Editor폴더에 있어야합니다.
메뉴 경로 설정

 [MenuItem("CustomMenu/Parent/Menu_4", false, 14)]
 static void Test_ContextMenu_4()
 {
 	Debug.Log("Menu_4");
 }
메뉴 활성화, 비활성화

[MenuItem("CustomMenu/Menu_2", false, 2)]
    static void Test_ContextMenu_2()
    {
        Debug.Log("Menu_2");
    }

    [MenuItem("CustomMenu/Menu_2", true)]
    static bool Validate_ContextMenu_2()
    {
        string sSelectObjectPath = AssetDatabase.GetAssetPath(Selection.activeObject.GetInstanceID());
        //! 유니티에서 선택한 파일이 .json파일이면 활성화
        if (sSelectObjectPath.Contains(".json"))
        {
            return true;
        }
        return false;
        //! false이면 비활성화, true면 활성화
    }
메뉴를 활성화, 비활성화 할 수 있으며 Validate함수에서 조건을 걸어서 활용 가능합니다.
위 예시는 유니티에서 마우스로 선택한 파일이 .json파일일때 메뉴를 활성화합니다.
유니티 메뉴에 추가하기

 [MenuItem("GameObject/CustomMenu/Menu_1", false, 1)]
    static void Test_ContextMenu_1()
    {
        Debug.Log("Menu_1");
    }
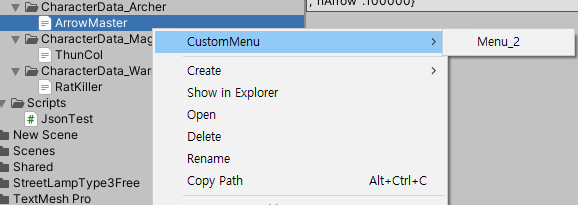
  [MenuItem("Assets/CustomMenu/Menu_2", false, 2)]
    static void Test_ContextMenu_2()
    {
        Debug.Log("Menu_2");
    }

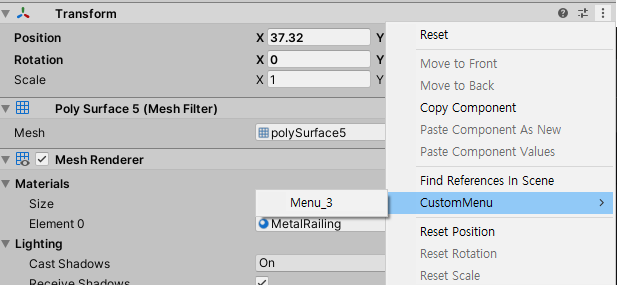
 [MenuItem("CONTEXT/Transform/CustomMenu/Menu_3", false, 13)]
    static void Test_ContextMenu_3()
    {
        Debug.Log("Menu_3");
    }
메뉴아이템 경로 맨앞에 유니티의 기본 경로로 설정하면 위와 같이 추가되는것을 확인 할 수 있습니다.
HotKey 사용하기

 // ctrl + shift + g 로 실행
    [MenuItem("CustomMenu/Menu_1 %#g", false, 1)]
    static void Test_ContextMenu_1()
    {
        Debug.Log("Menu_1");
}| 표 8.1 수식자 키를 나타내는 특수문자 % : Ctrl(Windows) 혹은 command(MacOSX) # : Shift & : Alt(Windows) 혹은 option(Mac OS X) _ : 수식자 키 없음 F1 ... F12 : Function키 HOME : Home 키 END : End 키 PGUP : PageUp 키 PGDN : PageDown 키 KP0 ... KP9 : 0부터 9까지의 숫자키 KP. : . KP+ : + KP- : - KP* : * KP/ : / KP= : = [Function 키만으로 되어 있는 단축키는 만들 수 없습니다] [출처] [에디터 확장 입문] 번역 8장 MenuItem|작성자 해머임팩트 |
반응형
'Unity > Programming' 카테고리의 다른 글
| [Unity Editor] Particle System에서 싱글 Emission 자동 세팅 (1) | 2020.06.28 |
|---|---|
| [Unity Editor] Assetdatabase - 에디터 단위 에셋관리 (0) | 2020.05.25 |
| [Unity Editor] Editor Window (2) | 2020.05.24 |
| Unity에서 Json파일 입출력 (3) | 2020.05.23 |
| Unity Particle System(Shuriken) : Custom Data 사용하기 (1) | 2019.09.22 |
WRITTEN BY
- CatDarkGame
Technical Artist dhwlgn12@gmail.com
,


