


Cel Shading은 3D 오브젝트에 외각선을 강조하고, 명암을 표현 할 때 그라데이션이 아닌 단계별로 표현하여 만화 같은 느낌을 내는 것으로 Toon Shading, Cartoon Rendering이라고도 불린다.

대표적인 Cel Shading 게임으로 길티기어, 젤다야숨, 스트리트 파이터 등 여러 게임이 있고 각각 구현 기법이 다르다.
이번 포스팅에서는 간단하게 Outline(외각선), Banded Lighting(단계별 음영) 표현을 하는 쉐이더를 구현하여
만화 느낌나는 Cel Shading을 구현 방법을 작성한다.

기본 세팅

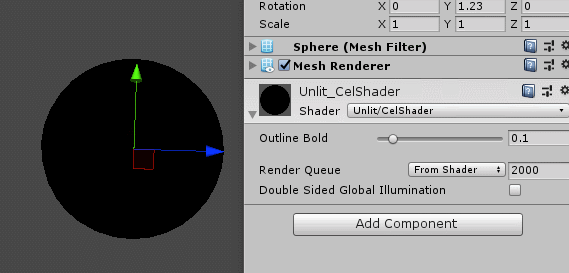
Unity 2018.3.0f2 버전을 사용하고 있으며 우선 Project탭에서 Unlit Shader를 만든다.
|
1
2
3
4
5
6
7
8
9
10
11
12
13
14
15
16
17
18
|
Shader "Unlit/CelShader"
{
Properties
{
}
SubShader
{
Tags { "RenderType"="Opaque" }
Pass
{
CGPROGRAM
ENDCG
}
}
}
|
cs |
기본 코드를 전부 제거하여 위 코드와 같이 만든다.
1. Outline(외각선)

외각선을 구현하는데에 여러가지 방법이 있지만 이번엔 2Pass Outline 기법으로 구현을 해본다.
Pass란 쉐이더의 렌더링에서 한번 거쳐가는 단위로서 SubShader에서는 여러개의 Pass를 작성 할 수 있고 Outline을 만들기 위해서 2개의 Pass를 사용한다고 해서 2Pass Outline 기법이라고 이름을 정했다.

원리는 1번 Pass의 Vertex Shader에서 메쉬의 버텍스 좌표에 메쉬 노말 방향을 더하여 부피를 크게 출력하고 그 위에
2번 Pass인 조명 연산된 메쉬를 출력하여 외각선을 표현하는 원리다.
-1 Vertex & Fragment Shader 세팅

#pragma 지시자를 통해서 사용할 Vertex Shader함수, Fragment Shader함수를 정해주고 아래에 해당 이름과 동일한
함수를 만들면 각 선언된 함수에서 버텍스, 프래그먼트 쉐이더를 작성 할 수 있게 된다.

추가로 "UnityCG.cginc"를 포함명령어(#include)통해 추가 한다. 유니티에서 지원해주는 렌더링에 필요한 기능들을
제공 한다.

버텍스 쉐이더 Input, Output 구조체를 만들었다. Input에서는 버텍스 좌표, 노말 벡터만 받고 Output에서는 버텍스
좌표만 Fragment Shader로 넘긴다.

버텍스 쉐이더 내에서 버텍스 좌표를 노말 방향으로 더해줘 크기 조절 할 수 있는 코드를 작성
(_Outline_Bold는 Properties에 만든 float 변수)

프래그먼트 쉐이더는 단순히 색만 return해주는 역할로 위 코드로 검은색을 출력하게 됨
2. Banded Lighting(단계별 음영)

|
1
2
3
4
5
6
7
8
9
10
11
12
13
14
15
16
17
18
19
20
21
22
23
24
25
26
27
28
29
30
31
32
33
34
35
36
37
38
39
40
41
|
CGPROGRAM
#pragma surface surf _BandedLighting //! 커스텀 라이트 사용
struct Input
{
float2 uv_MainTex;
};
sampler2D _MainTex;
void surf(Input IN, inout SurfaceOutput o)
{
float4 fMainTex = tex2D(_MainTex, IN.uv_MainTex);
o.Albedo = fMainTex.rgb;
o.Alpha = 1.0f;
}
//! 커스텀 라이트 함수
float4 Lighting_BandedLighting(SurfaceOutput s, float3 lightDir, float3 viewDir, float atten)
{
//! BandedDiffuse 조명 처리 연산
float3 fBandedDiffuse;
float fNDotL = dot(s.Normal, lightDir) * 0.5f + 0.5f; //! Half Lambert 공식
//! 0~1로 이루어진 fNDotL값을 3개의 값으로 고정함 <- Banded Lighting 작업
float fBandNum = 3.0f;
fBandedDiffuse = ceil(fNDotL * fBandNum) / fBandNum;
//! 최종 컬러 출력
float4 fFinalColor;
fFinalColor.rgb = (s.Albedo) *
fBandedDiffuse * _LightColor0.rgb * atten;
fFinalColor.a = s.Alpha;
return fFinalColor;
}
ENDCG
|
cs |
1번 Pass 다음 구문에 CGPROGRAM~ENDCG를 작성하여 다음 2번 Pass를 만든다, 이 Pass는 커스텀 라이트를 사용하는 Surface 쉐이더이다.

코드는 Half Lambert 공식과 거의 흡사하지만 위 NDotL을 핵심 코드를 통해 음영처리는 단계별로 보이게 만들 수 있다.
위 코드에 보이는 ceil함수는 소수점 올림 함수로 위 공식을 통해 0~1로 된 값을 0.3333, 0.6666, 1.0 으로 나눠진다.
위 코드대로 작성하지만 한 가지 문제가 발생할 것이다.
원인은 간단하다, 1Pass에서 노말 벡터 방향 만큼 더해진 버텍스출력이 2Pass를 가려서 생긴 현상이다.

이 현상은 컬링(Cull)이라는 명령어로 해결 할 수 있으며 Cull은 폴리곤의 어느 한쪽을 그리지 않을지 제어하는 명령어다.
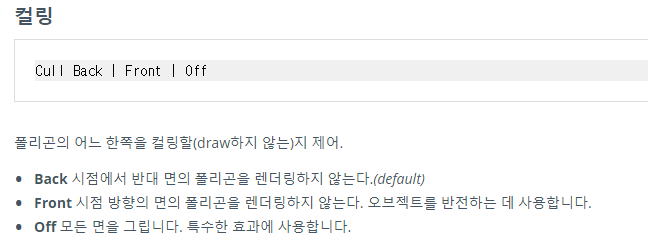

각 Pass 앞에 위 처럼 명령어를 적으면 해결 된다.

3. LUT를 통한 Banded Lighting 처리

-LUT(Look Up Table)
단순히 뜻을 풀이하면 미리 계산된 데이터 배열이라는 뜻이다, 비유하자면 우리가 수학 문제지 안에 문제들을 풀이
할려면 해당 문제를 읽고 풀어야 한다, 하지만 정답지를 가지고 있다면 해당 문제 번호만 정답지에서 찾으면 우리가
문제를 풀지 않고 바로 답을 알 수 있다, 여기서 정답지가 바로 LUT이다.

그래서 이 포스팅에서는 이 LUT개념을 단계별 음영처리 부분에서 음영처리 부분을 어떻게 할 것 인가를 LUT Texture를 통해서 몇 단계인지, 무슨 색인지를 정하는 것을 구현 한다.


우선 샘플 LUT Texture를 첨부한다. LUT만드는 법은 쉐이더를 어떻게 구현했냐에 따라 다르겠지만 이 포스팅에서는 64x64크기의 이미지에 왼쪽은 어두운 음영, 우측은 밝은 음영 색을 넣었다.
-Texture 변수 세팅

우선 Properties인터페이스와 함께 sampler2D 변수를 만든다.
-Custom SurfaceOutput

텍스처 변수를 만들었는데 한 가지 이슈가 발생한다. 음영처리를 하는 부분이 커스텀 라이트함수 부분인데 LUT텍스처를
커스텀 라이트 함수로 보낼 방법이 없다.
다행히 Surface쉐이더 기능중에 Custom SurfaceOutput을 만드는 기능이 존재한다.
|
1
2
3
4
5
6
7
8
9
10
11
12
13
14
15
16
17
18
19
20
|
struct SurfaceOutputCustom {
fixed3 Albedo;
fixed3 Normal;
fixed3 Emission;
half Specular;
fixed Gloss;
fixed Alpha;
float3 BandLUT;
};
void surf (Input IN, inout SurfaceOutputCustom o)
{
...
}
fixed4 Lighting_BandedLighting(SurfaceOutputCustom s, fixed3 lightDir, fixed atten)
{
...
}
|
cs |
출처 : https://forum.unity.com/threads/add-extra-variable-to-surface-output.160883/
위 코드와 같이 SurfaceOutputCustom 이라는 구조체를 선언하여 surf의 인자값과 커스텀 라이트의 인자값에서 사용
하면 float3 BandLUT통해 커스텀 라이트에 변수를 전달 할 수 있다.

surf 함수에서 SurfaceOutputCustom에서 있는 float3 BandLUT 변수로 텍스처 컬러 값을 넘긴다.

이전에 ceil함수로 단계음영처리 했던 코드를 주석 처리하고 LUT Texture에 NDotL을 UV좌표 값으로 사용하여 텍스처
컬러 값을 사용한다.

4. Specular

|
1
2
3
4
5
6
7
8
9
10
11
12
13
14
15
16
17
|
float3 fSpecularColor;
float3 fHalfVector = normalize(lightDir + viewDir);
float fHDotN = saturate(dot(fHalfVector, s.Normal));
float fPowedHDotN = pow(fHDotN, 100.0f);
fSpecularColor = fPowedHDotN * 1.0f;
//! 최종 컬러 출력
float4 fFinalColor;
fFinalColor.rgb = ((s.Albedo * _Color) + fSpecularColor) *
fBandedDiffuse * _LightColor0.rgb * atten;
fFinalColor.a = s.Alpha;
return fFinalColor;
}
|
cs |
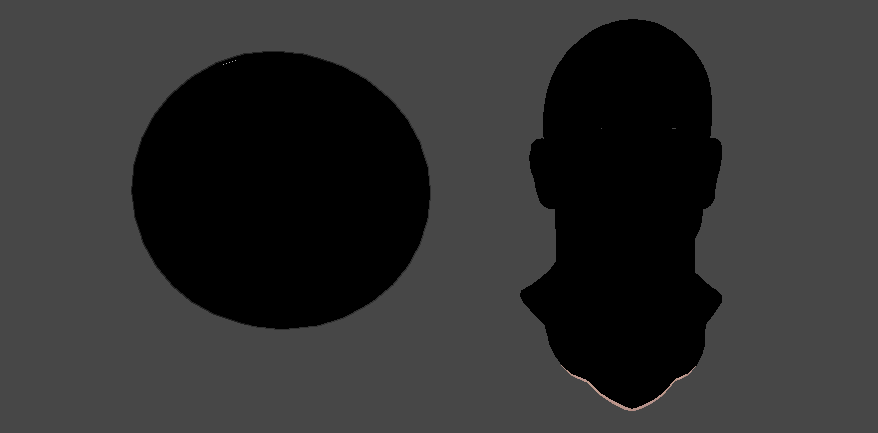
(Specular를 잘보이게 하기 위해 NormalMap, Color를 적용했다.)
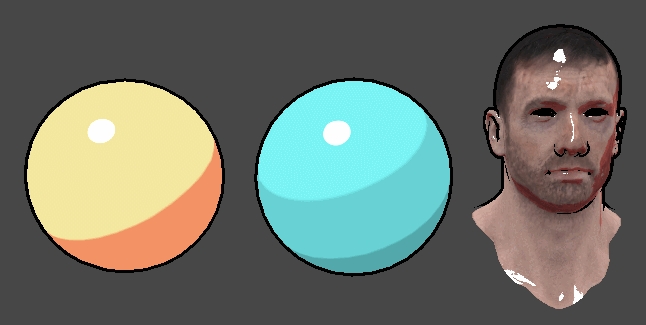
우선 간단하게 Blinn-Phong Specular 공식을 적용해봤다, 무언가 어색하다.
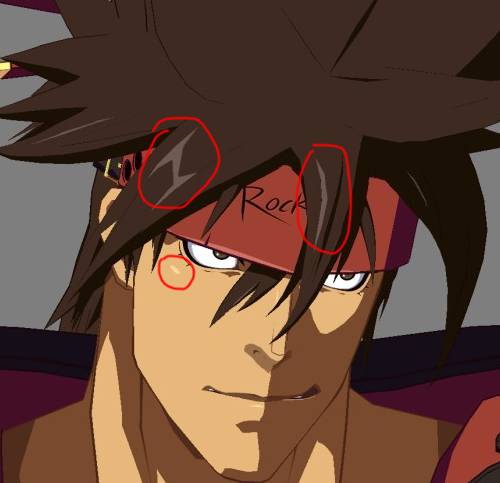
어떤 만화 표현을 하는 쉐이더 만드느냐에 따라 다르겠지만 길티기어를 예를 들면 Specular가 퍼져 있지 않고 딱 끊어져 표현되어 있다, 이런 Specular를 만들어 보자.

Blinn-Phong의 결과물인 HDotN값을 smoothstep함수를 통해서 0.005f ~ 0.01f값 사이로 강제 시켰다.
여기서 smoothstep이란

Lerp와 기능은 동일하지만 보간처리가 되어 값이 출력되는 수학 함수이다.
최종 결과 & 전체 쉐이더 코드
|
1
2
3
4
5
6
7
8
9
10
11
12
13
14
15
16
17
18
19
20
21
22
23
24
25
26
27
28
29
30
31
32
33
34
35
36
37
38
39
40
41
42
43
44
45
46
47
48
49
50
51
52
53
54
55
56
57
58
59
60
61
62
63
64
65
66
67
68
69
70
71
72
73
74
75
76
77
78
79
80
81
82
83
84
85
86
87
88
89
90
91
92
93
94
95
96
97
98
99
100
101
102
103
104
105
106
107
108
109
110
111
112
113
114
115
116
117
118
119
120
121
122
123
124
125
126
127
128
129
130
131
132
133
134
135
136
137
138
139
140
|
Shader "Unlit/CelShader"
{
Properties
{
_MainTex("Main Texture", 2D) = "white" {}
_Color("Main Tex Color", Color) = (1,1,1,1)
_BumpMap("NormalMap", 2D) = "bump" {}
_Outline_Bold("Outline Bold", Range(0, 1)) = 0.1
_Band_Tex("Band LUT", 2D) = "white" {}
}
SubShader
{
Tags { "RenderType"="Opaque" }
cull front //! 1Pass는 앞면을 그리지 않는다.
Pass
{
CGPROGRAM
#pragma vertex _VertexFuc
#pragma fragment _FragmentFuc
#include "UnityCG.cginc"
struct ST_VertexInput //! 버텍스 쉐이더 Input
{
float4 vertex : POSITION;
float3 normal : NORMAL;
};
struct ST_VertexOutput //! 버텍스 쉐이더 Output
{
float4 vertex : SV_POSITION;
};
float _Outline_Bold;
ST_VertexOutput _VertexFuc(ST_VertexInput stInput)
{
ST_VertexOutput stOutput;
float3 fNormalized_Normal = normalize(stInput.normal); //! 로컬 노말 벡터를 정규화 시킴
float3 fOutline_Position = stInput.vertex + fNormalized_Normal * (_Outline_Bold * 0.1f); //! 버텍스 좌표에 노말 방향으로 더한다.
stOutput.vertex = UnityObjectToClipPos(fOutline_Position); //! 노말 방향으로 더해진 버텍스 좌표를 카메라 클립 공간으로 변환
return stOutput;
}
float4 _FragmentFuc(ST_VertexOutput i) : SV_Target
{
return 0.0f;
}
ENDCG
}
cull back //! 2Pass는 뒷면을 그리지 않는다.
CGPROGRAM
#pragma surface surf _BandedLighting //! 커스텀 라이트 사용
struct Input
{
float2 uv_MainTex;
float2 uv_Band_Tex;
float2 uv_BumpMap;
};
struct SurfaceOutputCustom //! Custom SurfaceOutput 구조체, BandLUT 텍스처를 넣기 위해 만듬
{
fixed3 Albedo;
fixed3 Normal;
fixed3 Emission;
half Specular;
fixed Gloss;
fixed Alpha;
float3 BandLUT;
};
sampler2D _MainTex;
sampler2D _Band_Tex;
sampler2D _BumpMap;
float4 _Color;
void surf(Input IN, inout SurfaceOutputCustom o)
{
float4 fMainTex = tex2D(_MainTex, IN.uv_MainTex);
o.Albedo = fMainTex.rgb;
o.Alpha = 1.0f;
float4 fBandLUT = tex2D(_Band_Tex, IN.uv_Band_Tex);
o.BandLUT = fBandLUT.rgb;
float3 fNormalTex = UnpackNormal(tex2D(_BumpMap, IN.uv_BumpMap));
o.Normal = fNormalTex;
}
//! 커스텀 라이트 함수
float4 Lighting_BandedLighting(SurfaceOutputCustom s, float3 lightDir, float3 viewDir, float atten)
{
//! BandedDiffuse 조명 처리 연산
float3 fBandedDiffuse;
float fNDotL = dot(s.Normal, lightDir) * 0.5f + 0.5f; //! Half Lambert 공식
//! 0~1로 이루어진 fNDotL값을 3개의 값으로 고정함 <- Banded Lighting 작업
//float fBandNum = 3.0f;
//fBandedDiffuse = ceil(fNDotL * fBandNum) / fBandNum;
//! BandLUT 텍스처의 UV 좌표에 0~1로 이루어진 NDotL값을 넣어서 음영 색을 가져온다.
fBandedDiffuse = tex2D(_Band_Tex, float2(fNDotL, 0.5f)).rgb;
float3 fSpecularColor;
float3 fHalfVector = normalize(lightDir + viewDir);
float fHDotN = saturate(dot(fHalfVector, s.Normal));
float fPowedHDotN = pow(fHDotN, 500.0f);
//! smoothstep
float fSpecularSmooth = smoothstep(0.005, 0.01f, fPowedHDotN);
fSpecularColor = fSpecularSmooth * 1.0f;
//! 최종 컬러 출력
float4 fFinalColor;
fFinalColor.rgb = ((s.Albedo * _Color) + fSpecularColor) *
fBandedDiffuse * _LightColor0.rgb * atten;
fFinalColor.a = s.Alpha;
return fFinalColor;
}
ENDCG
}
}
|
cs |
'Study > Shader' 카테고리의 다른 글
| Unity Shader - Water (4) | 2019.06.15 |
|---|---|
| Unity Custom Light 5강 - Reflection (0) | 2019.06.08 |
| Unity Custom Light 제작 4강 - 자체 라이트 모델 쉐이더 제작2 (0) | 2019.05.03 |
| Unity Custom Light 3강 - Specular (0) | 2019.05.03 |
| Unity 홀로그램 쉐이더 (0) | 2019.04.27 |
WRITTEN BY
- CatDarkGame
Technical Artist dhwlgn12@gmail.com